Installation
Installing pvlib-python ranges from trivial to difficult depending on your python experience, how you want to use pvlib, and your system configuration.
Do you already have Python and the NumPy and Pandas libraries?
If the answer to this is No, follow the If you don’t have Python instructions to obtain the Anaconda Python distribution before proceeding.
Do you want to use the pvlib-python as-is, or do you want to be able to edit the source code?
If you want to use pvlib-python as-is, follow the simple Install standard release instructions.
If you want to be able to edit the source code, follow the Install as an editable library instructions.
Installing pvlib-python is similar to installing most scientific python packages, so see the References section for further help.
Please see the Compatibility section for information on the optional packages that are needed for some pvlib-python features.
If you don’t have Python
There are many ways to install Python on your system, but the Anaconda Python distribution is the easiest way for most new users to get started. Anaconda includes all of the popular libraries that you’ll need for pvlib, including Pandas, NumPy, and SciPy.
Install the Anaconda Python distribution available at Anaconda.com.
See What is Anaconda? and the Anaconda Documentation for more information.
You can now install pvlib-python by one of the methods below.
Install standard release
Users may install pvlib-python using either the conda or pip package manager. We recommend that most users install pvlib-python using the conda package manager in the Anaconda Python distribution. To install the most recent stable release of pvlib-python in a non-editable way, use one of the following commands to install pvlib-python:
# get the package from the pvlib conda channel
# best option for installing pvlib in the base Anaconda distribution
conda install -c pvlib pvlib

# get the package from the conda-forge conda channel
# best option if using pvlib.forecast module
# strongly recommend installing in a separate conda env as shown below
conda create -n pvlib -c conda-forge pvlib-python; conda activate pvlib

# get the package from the Python Package Index
# best option if you know what you are doing
pip install pvlib

# get pvlib and optional dependencies from the Python Package Index
# another option if you know what you are doing
pip install pvlib[optional]
Note
By default, pvlib will not install some infrequently used dependencies. If you run into an error such as ModuleNotFoundError: No module named ‘netCDF4’ you can either install pvlib with all optional dependencies using pip install pvlib[optional], or you can install pvlib from conda-forge conda create -n pvlib -c conda-forge pvlib-python; conda activate pvlib.
If your system complains that you don’t have access privileges or asks for a password then you’re probably trying to install pvlib into your system’s Python distribution. This is usually a bad idea and you should follow the If you don’t have Python instructions before installing pvlib.
You may still want to download the Python source code so that you can easily get all of the Jupyter Notebook tutorials. Either clone the git repository or go to the Releases page to download the zip file of the most recent release. You can also use the nbviewer website to choose a tutorial to experiment with. Go to our nbviewer tutorial page.
Install as an editable library
Installing pvlib-python as an editable library involves 3 steps:
None of these steps are particularly challenging, but they become more difficult when combined. With a little bit of practice the process will be fast and easy. Experienced users can easily execute these steps in less than a minute. You’ll get there.
Obtain the source code
We will briefly describe how to obtain the pvlib-python source code using the git/GitHub version control system. We strongly encourage users to learn how to use these powerful tools (see the References!), but we also recognize that they can be a substantial roadblock to getting started with pvlib-python. Therefore, you should know that you can download a zip file of the most recent development version of the source code by clicking on the Download Zip button on the right side of our GitHub page or download a zip file of any stable release from our Releases page.
Follow these steps to obtain the library using git/GitHub:
Download the GitHub Desktop application.
Fork the pvlib-python project by clicking on the “Fork” button on the upper right corner of the pvlib-python GitHub page.
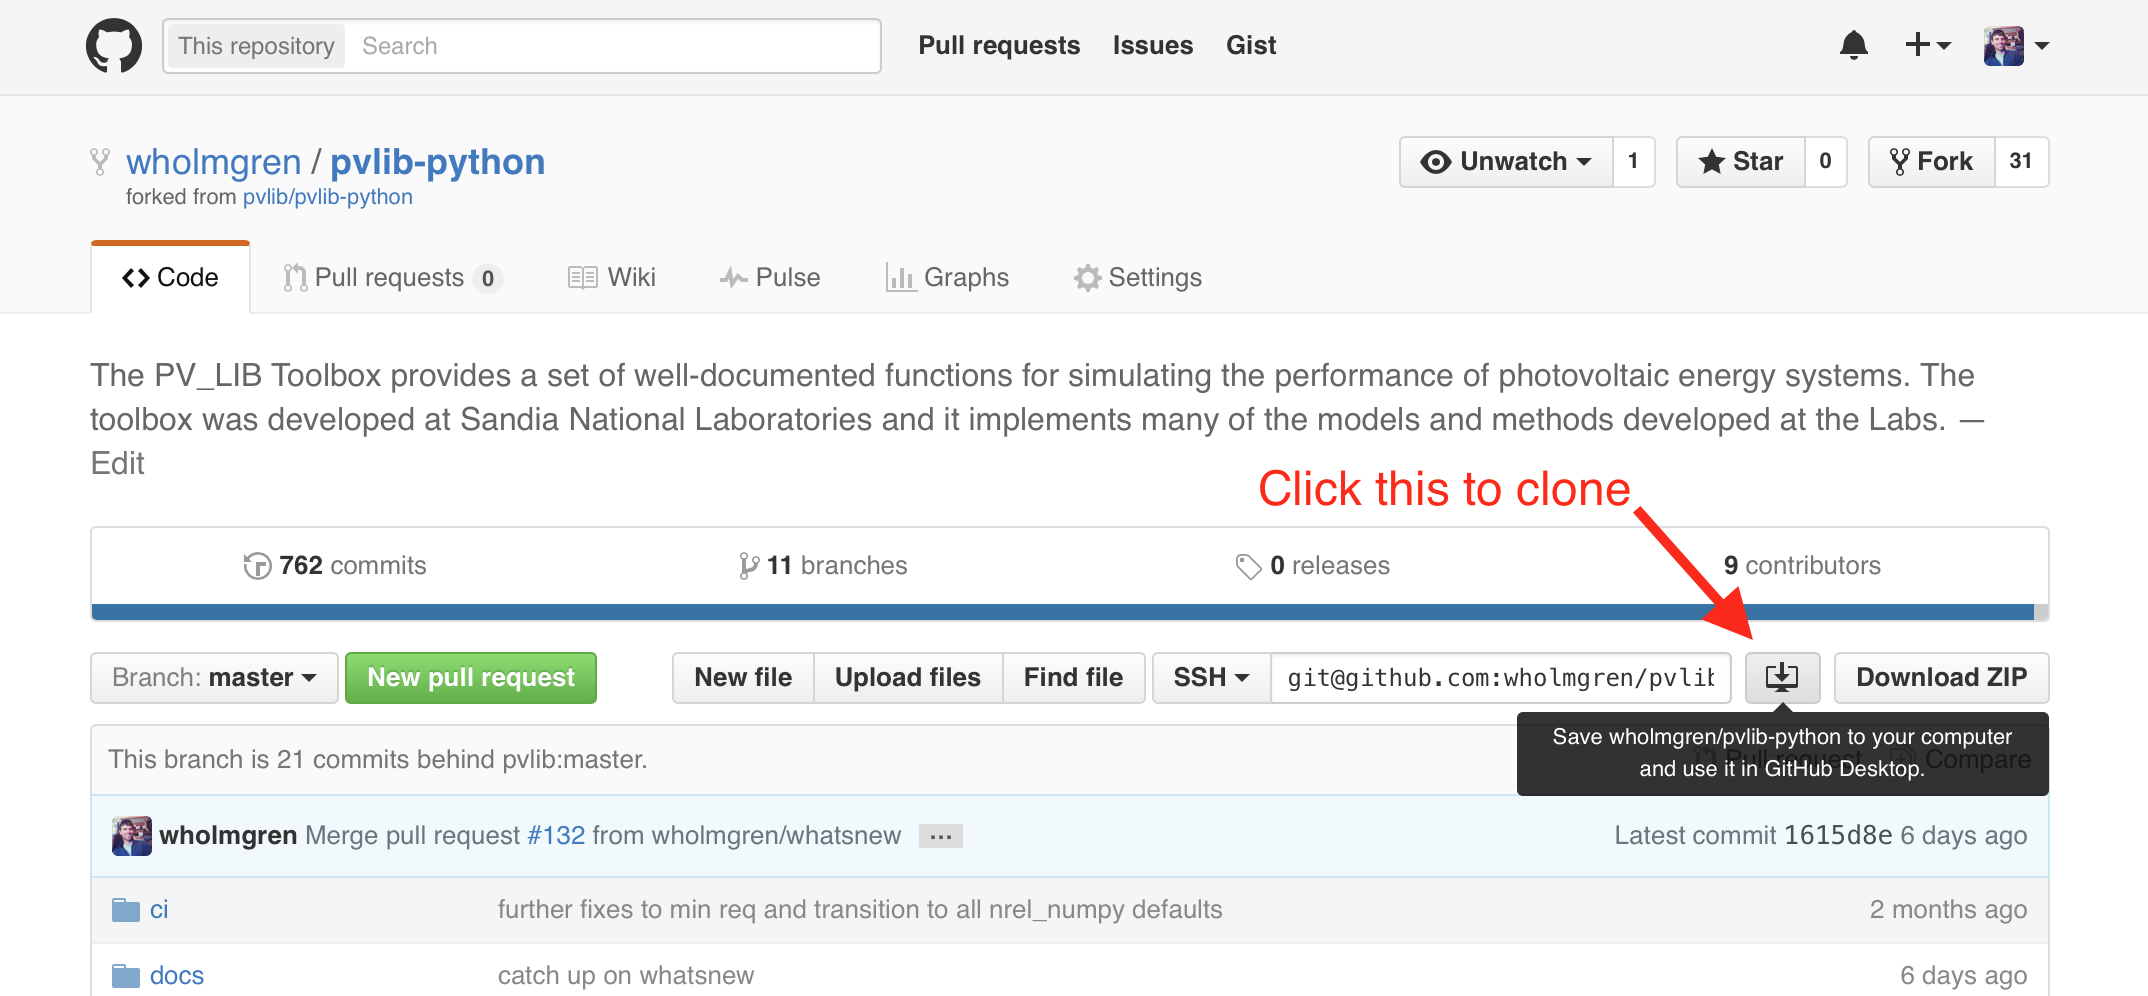
Clone your fork to your computer using the GitHub Desktop application by clicking on the Clone to Desktop button on your fork’s homepage. This button is circled in the image below. Remember the system path that you clone the library to.
Please see GitHub’s Forking Projects, Fork A Repo, and the git-scm for more details.
Set up a virtual environment
We strongly recommend working in a virtual environment if you’re going to use an editable version of the library. You can skip this step if:
You already have Anaconda or another scientific Python distribution
You don’t mind polluting your Python installation with your development version of pvlib.
You don’t want to work with multiple versions of pvlib.
There are many ways to use virtual environments in Python, but Anaconda again provides the easiest solution. These are often referred to as conda environments, but they’re the same for our purposes.
Create a new conda environment for pvlib and pre-install the required packages into the environment:
conda create --name pvlibdev python pandas scipyActivate the new conda environment:
conda activate pvlibdevInstall additional packages into your development environment:
conda install jupyter ipython matplotlib pytest nose flake8
The conda documentation has more
information on how to use conda virtual environments. You can also add
-h to most pip and conda commands to get help (e.g. conda -h or
conda env -h)
Install the source code
Good news – installing the source code is the easiest part! With your conda/virtual environment still active…
Install pvlib-python in “development mode” by running
pip install -e .from within the directory you previously cloned. Consider installing pvlib usingpip install -e .[all]so that you can run the unit tests and build the documentation. Your clone directory is probably similar toC:\Users\%USER%\Documents\GitHub\pvlib-python``(Windows) or ``/Users/%USER%/Documents/pvlib-python(Mac).Test your installation by running
python -c 'import pvlib'. You’re good to go if it returns without an exception.
The version of pvlib-python that is on that path is now available as an installed package inside your conda/virtual environment.
Any changes that you make to this pvlib-python will be available inside
your environment. If you run a git checkout, branch, or pull command the
result will be applied to your pvlib-python installation. This
is great for development. Note, however, that you will need to use
Python’s reload function (python 3)
if you make changes to pvlib during an interactive Python
session (including a Jupyter notebook). Restarting the Python
interpreter will also work.
Remember to conda activate pvlibdev (or whatever you named your
environment) when you start a new shell or terminal.
Compatibility
pvlib-python is compatible with Python 3.
pvlib-python requires Pandas, Numpy, and SciPy. The minimum version requirements are specified in setup.py. They are typically releases from several years ago.
A handful of pvlib-python features require additional packages that must be installed separately using pip or conda. These packages/features include:
statsmodels: parameter fitting
numba: fastest solar position calculations
pyephem: solar positions calculations using an astronomical library
siphon: forecasting PV power using the pvlib.forecast module
The Anaconda distribution includes most of the above packages.
Alternatively, users may install all optional dependencies using
pip install pvlib[optional]
NREL SPA algorithm
pvlib-python is distributed with several validated, high-precision, and high-performance solar position calculators. We strongly recommend using the built-in solar position calculators.
pvlib-python also includes unsupported wrappers for the official NREL SPA algorithm. NREL’s license does not allow redistribution of the source code, so you must jump through some hoops to use it with pvlib. You will need a C compiler to use this code.
To install the NREL SPA algorithm for use with pvlib:
Download the pvlib repository (as described in Obtain the source code)
Download the SPA files from NREL
Copy the SPA files into
pvlib-python/pvlib/spa_c_filesFrom the
pvlib-pythondirectory, runpip uninstall pvlibfollowed bypip install .
References
Here are a few recommended references for installing Python packages:
Here are a few recommended references for git and GitHub:
The git documentation: detailed explanations, videos, more links, and cheat sheets. Go here first!